

Dante's Dogfight Guide - Basics, Mechanics, Strategy
Preface
Welcome!
In case someone stumbles in here:
Netrek is a 16-player online game, open source & freeware. I invite you to visit www.netrek.org to find resources and how to play.
Revised October 2007
Improved introduction
Introducing Graphics & Diagrams
Greatly Improved Discussion on Torping and Dodging
Rewrites Throughout
On the To-Do Agenda
Positioning & Clue Guide
If you see me online & sucking, and find yourself saying "why the hell should I listen to this guy?" just remember - anyone can get rusty. And were you EVER a 2.0+ offense top tier df? I was, and if you weren't - I can still tool your ass. ;) (Hmm... tongue in cheek's a little tough to convey on a page - 'know?)
Good Luck,
Dantes (tb3)
PS:
There is also a DF Manual for Total Beginners by Charlie/Zex.
Dante's DF Guide
Dogfighting Basics: Guide by Dantes (tb3)
This guide is a mix of practical information on layout and tactics with theory.Organized By:
- I. Intro: Biomechanics and its Relation to Netrek
- II. Theory: Doing Damage That Can't Be Avoided
- III. Controls: How to Prepare Your Setup for Dogfighting (Keymap)
- IV. Comments for Beginners on Movement & Weapons
- V. Tactical Dogfighting Tips
- VI. Dodging & a System for Developing Movement
I. Intro: Advice About Biomechanics and Implementing its Lessons in Netrek
Are you an analytical type? Then you'll want maybe to read this article. How to Grow a Super Athlete:
If not, here's the basic advice: if you want to get good at a physical activity:
- Hours matter a ton, but it's not just practice:
- Train with correct form. Practice the right kind of movements, and then repeat. Incessantly.
So what does this mean? Here's my advice.
- Get used to moving the mouse to several different points with precision and within a second and a half.
- While being used to hitting other keys and mouse buttons with speed and accuracy. Meaning:
- You move the mouse to direct your ship,
- you move it to fire,
- you move it to pressor off of another ship,
- you move it to fire again, you move it to turn.
All of the above saying: a netrek dogfight at its highest levels is a very click and button-intensive thing. And you don't ever get to learn how to do this unless you practice doing the same mouse and key-work.
Good dogfighting is very useful to your team. And very fun.
II. Doing Damage & The Core of Dogfighting A. Unpreventable Damage
The core principle is obvious. Do damage, and avoid damage yourself. Knowing when NOT to avoid damage is part of being clueful, but that's another discussion.
Here we're talking about:
Keymap / Setting Up Your System
An almost sinfully bad part of netrek has to do with the default keymap that comes on clients these days. It's just... bad.
Fortunately, everyone these days has a text editor (Notepad or Wordpad for the Windows folks) and a manual on how to configure your client that comes with the download. Basically open up the netrekrc file (.xtrekrc for Unix variants, do your edits and save without renaming the file. Here is what you should consider.
Keys Important to Dogfighting:
You can go at whatever speed you want by using two keys - a low speed, and the maxwarp key. That low speed should be warp 3 or less. The turning radius of a CA at warp 4 is too large for it to be the slowest that you go. You NEED to be able to turn on a dime when the situation warrants.
Experienced Players use:
I use the 3 key (warp 3) and the e key (custom mapped to maxwarp) for motion. Accelerate with maxwarp, hit 3 to slow back down. I tend to hover at 3, and am often between 3 and 5. When chasing I tend to hover between 6 and 9 - Get up to 9, slow down key (until w6), maxwarp again... Warp 6 is a much easier dodge than 9. Some players use warp 2, and pog claims to use warp 0 as his lowt warp speed. Tap back and forth, indeed.
Tractor and Pressor can:
Enough said? There's NO SUCH THING as a top flight dogfighter in netrek who does not use t/p (tractor/pressor - it has its own catchphrase acronym) extensively.
Experience Players use:
I prefer absolute on (specially mapped key) over toggles, but that's just a matter of preference. You don't twitch yourself into turning it off then, and they work for hockey. It doesn't affect your overall potential.
Recap: I insist. In building your keymap, t/p must be prioritized.
I set up that exact key conflict by accident, and it hurt. I still got extremely good, but it held me back from being where I could have been.
There are four ways to do damage that enemies cannot avoid, only three of which you can do consistently. These four are:
For visual details on these methods, I highly recommend visiting Charlie's excellent introductory dogfighting web page, located here. The team det is the fourth method on his list. Plasma is never an assured way of doing damage.
Secondary / Useful in Combat:
Here are thoughts on how you might arrange those commands, and why.
Me: I have prioritized them sufficiently to make them the only task of my pointing finger. Pressor on on r, Tractor on on t, Remove pressor/tractor on g.
Dan/Tuber: Put them (what was it, Dan? d and f?) on TWO fingers, for quickly flipping back and forth.
Erik/el0g: Apparently put tractor and pressor on his MOUSE, for crying out loud! (Ah, we all miss Erik). It might have had something to do with his quality as a base, btw
Make sure you can easily access torpedoes and phasers without interfering with any of the other critical commands. In other words, do NOT use the same finger for speeds and phaser, because there will be times when you want to phaser while accelerating or decelerating and if you have set up a conflict, you can't.
Keymap: r^t_g$alqR dfDw%hedpvr
What does this keymap do?
- Puts tractor, pressor, and remove t/p on r, t and g.
- Puts lock on, repair, and det enemy torps on a, q and space bar.
- Puts det own torps, maxwarp, and starbase docking permissions on f, w, and h.
- Puts phaser and change ship type on d and v.
- Weakness: I am putting maxwarp on a weak finger. This might not be the way to go.
Other possibilities:
Place phaser on mouse
Place maxwarp/minwarp or tractor/pressor to a and s, move lock on to w
A couple years before I put up this guide, Niclas (Big Swede!, River Runs Red) posted some keymap advice on rgn. Some of his ideas are different, and I like them quite a lot. I've put it up here. Highly recommended.
If any of this keymap advice is confusing, I suggest visiting an empty server and pulling up the help menu, which will have every key listed. It SHOULD be h on a default client setup, but it's also available through the options menu screens (shift o).
IV. Comments for Beginners on Movement & Weapons
Maneuvering and Positioning Tactics
Ultimately, Netrek is a game about taking planets, where enemies are the obstacles. Dogfighting is about the removal or outmaneuvering of those obstacles. Means to an end.
As such, consider this - a pick & roll is an effective basketball maneuver for helping another player to approach the basket. It works in Netrek as well. You don't always need to blow someone up to be tactically very effective.
Next, realize the value of being where someone else wants to be. Try getting in the way of where enemies will have to fly in order to make plays. Get in the middle, and then you can engage in delaying tactics, including buttorping.
I must repeat - positioning and situation have a high impact on the best choice of dogfighting maneuvers. As you become more experienced, your objectives will have an ever greater impact upon your methods.
How to use Tractor/Pressor
Tractor and Pressor are easy to slip into a routine. If you hit the tractor or pressor key, it affects the ship that is closest to your cursor. This means that while you have to pay some attention to where your cursor is, you don't need precision.
Tractor is useful when you want to pull the ships together. You might want to pull the enemy into stray torps, or pull them in for an agressive (and more damaging) phaser shot, or to pull yourself out of the line of stray torps.
Pressor is extremely effective for dodge. You push the other ship away. Like when they are charging at you. Or when you need just a slight fraction of a centimeter more space to dodge their torps. You can also push someone into or away from torps with it.
Used together, they can be extremely effective. And yo-yoing your opponent is a very good way to throw them off. It's absolutely great when you can do this without getting thrown off, yourself.
How to use Torps
I've already discussed torps in part. The cloud is the solution 60-80% of the time --- try to hit a few torps but not all of them. Wiggle the mouse a little bit. Make sure there's a line in your netrekrc file that says continuousMouse: on. See below --- a cloud is hard to dodge.
But you can also do a lot of good with half size clouds. Think of it this way: You can have some fun sending a few torps to where someone is heading, THEN send a few to where you think they'll dodge to. And you You have more fun when you see people doing familiar patterns, especially high warp speed patterns.
It's all about leading torps and dispersing them in a useful manner. I've made a franchise out of sending torp streams like the above against enemies moving at high speed. It's about dragging the mouse down their flight path.
How to use Phasers
Phasers are an aggressive weapon that is impossible to dodge.Phasers are an aggressive weapon. The closer you are to an enemy, the more damage they do. Phaser a lot, and you will find yourself doing more damage quicker, and learning how to fight up close. These are good. You should get accustomed to the 1 second (except for bases) recharge rate for phasers. Fire a phaser then do something else. Then fire again.
I cannot walk away unscathed from a fight against someone who phasers me. Newbies who try to torp me often miss, because I can dodge. I can't dodge phasers.
Remember: 20 point phaser range is about what people have theorized is the best MINIMUM damage. I suggest doing a lot of fighting at the 30-40 point phaser range, myself.
When I wrote the first version of this guide, I used a 17" Trinitron for a monitor. 20 pt range was about 1 physical inch at 1024 x 768
Expanded comments on the DD & weapons training:
The ramifications of the above?
The BB and CA are the two strongest ships for dogfighting. BBs used to win almost all of the dogfighting contests of yesteryear, and would be best for sure if it didn't turn and accelerate like a pregnant yak. Thus we have the CA. And my strong recommendation to most players to NOT play the DD as their ship of choice.
The tale of the tape is simple enough. The DD is inferior in the department of the phaser (15 points less damage per shot than the CA at equal range), torps (30 points as opposed to 40), tractor strength, and pressor strength. This means it can't be aggressive as other ships in doing useful things for your team.
- The torp cloud and phaser are critical weapons when attempting to grab territory. The cloud forces enemies to spend time dodging, and the phaser lets you do damage to someone consistently while you spend time dodging, yourself.
- Lower tractor & pressor means the DD can't pull ships back and forth like a rag doll, save teammates, or dodge without running away.
What the DD is good at is buttorping, at which it is frankly above average. You fly up, play rope a dope, and Spathi away while your warp 14 torps arrive faster than people expect. It's just darn seductive for a new player, and darn poor for their development as a player.
- You can't always buttorp in a face to face confrontation
- Experienced players will be able to dodge you often enough - you need other tactics accessible
- You can't limit your own clicking speed and accuracy by always trying to make it easy
Where I think it has a specific use is as a specialty ship. I've seen the DD used effectively in trying to take enemy planets, especially core planets (close to, but not at LPS). Mainly the tactic is to fake to one planet, and then use the DD's fuel efficiency, cloaking efficiency, acceleration and speed to move to another. It seems to me that this is a legitimate tactic when done well.
Analysis of torp spray uses
Let me preface this by saying I've gotten my rear kicked many times by top players fighting me with nothing but phasers. It's because they dodge my torps and have slightly more reliable phasers. As a general tactic, though - they still spray too. Really. You want a nice clump that will be a reasonable balance between being spread out to make dodging tougher and tight enough that the ship can't weave through it.
But it's so tactical too. The spray is your cover when trying to clear ground for a carrier. It'll be your lead-n for most fights. The spray makes enemies turn to avoid you, and during the time that they are occupied, you can pounce & then dodge away as they retaliate. And you can spray an area of space where someone is cloaked to try to tag them and figure out where they are (a common base tactic).
There's nothing like sending something so damaging that is virtually impossible to dodge
Using Phasers While Lagged
Lots of folks used to play this game with 250 ms lag. I did it for a good while, with some success. So here's the deal.
You can shoot people when they face toward you or away from you. When they are flying perpendicular/side to side they are a pain in the ass to hit.
It's simple. There's a delay between when you click and when the phaser comes out. They're still in the same line as the phaser if they're flying at you, no matter when the thing actually comes out.
Remember, without them, you lose half of your offense. Remember, lines cannot be dodged.
Phasering to Find Cloaked Enemies
Cloaking is not an extremely effective tactic, but it is effective against newer players often.
Experience will teach you something about where someone will be. A player with a lot of experience can tag someone who's cloaked out of nowhere seemingly. Some of that's a matter of instinctively estimating the speed of someone and where they're going. But there's another part of this.
An enemy that is moving from left to right is not going to be easy to attack if you are not on the same plane as them. As in, two inches south of them.
When you move to where you reduce the angle - where they are flying at your phasers - you have a much higher chance of hitting. THIS is how people phaser oggers.
Buttorping - Basics
Buttorping is an essential activity at times when you are holding enemy territory and you don't want to get blown up. Part of the trick to buttorping well is being able to send accurate torps at enemies' faces, while NOT getting pushed very much.
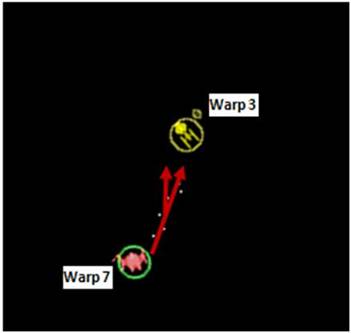
A turn ninety degrees can encourage an enemy to turn as well. Since the other person had to react to do this, they are following you. Boom, a buttorping opportunity. Buttorp well, and it will not always be a tactical disadvantage.
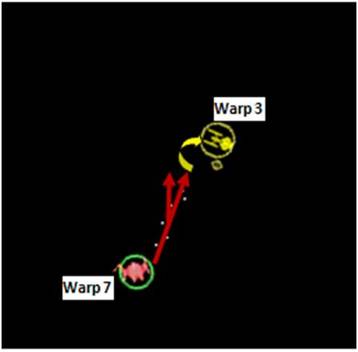
If R8 heads in the direction of the arrow, F0 will be behind him quickly if he turns late (and is foolish) Note that this is NOT an advanced tactic. This is NOT something you should rely on -- but good buttorping does often operate on this principle.
As commented in my suggestion not to fly the DD, buttorping can be death of your tactical advance, and your evolution of skill if you rely upon it to get the job done. You need plenty of practiced motion devoted towards flying towards people or halfway towards them if you want to escort on short notice, defend your base, and so on.
Oh, my though. You want the buttorping advantage at times - you really do.
The Buttphaser
The buttphaser is a high quality tactic that you do find top dogfighters using. You're pointed mostly away from the enemy, but you turn so you stay close enough to do decent damage with the phaser. Just dodge constantly, and keep making 20-25 point jabs.
The Flyby Attack & Avoiding it
One of the tips of an otherwise ok dogfighting guide from yesteryear was to pull up next to someone at warp 8 or warp 9, unload a volley of torps, and tractor. This is an outdated tactic. Why?
First, since that was written the typical number of updates per second has increased from 5 to 10 per second. This means it's possible to see what people are doing and react faster than the days of yore. Dodging is much easier. Second, folks who have played this game a lot have good senses of where torps will end up, and how to avoid these things quickly. Third, it's easy and doesn't develop your skills and instincts if you rely upon it.
So don't incorporate this into your main strategy. It can be effective at times, but it's such a common tactic and is far less effective on clue than you'd think.
How to avoid the flyby & a broader dogfighting tip:
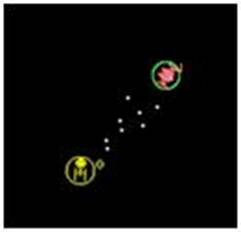
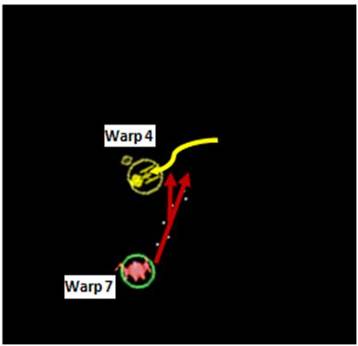
- The flyby sets torps going towards you at a diagonal, outward and forward from the enemy. Vector going north, you go south. Go either inward or backward. Any time you go against one of the vectors it's pretty easy to dodge torps.
- Torps are fired towards the space F0 will occupy. If he tries to outrun them in the same direction, he's toast.
-
But no worries. He's quick on the uptake, and does a turn away / probably using pressor to get a hair more leverage. Vector pointing west, you turn east
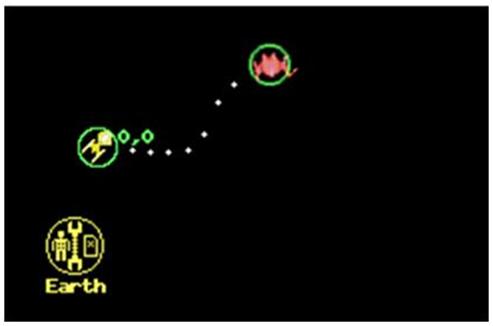
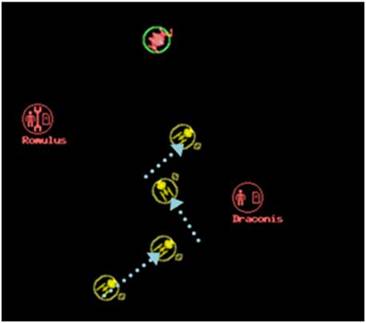
 On the other hand, maybe he's aggressive - he has another dodge. He can move underneath the torps and closer to his enemy. Dodge through where the torps will arrive - before they get there. It's a more nerve wracking but surprisingly easy dodge to perform. And oh look, the rom is nearby and just waiting to get shot at at close range.
Dealing With The Ogg
An attack based on cloaking, approaching an enemy, uncloaking and firing at them is known in netrek parlance as an ogg.
The ogg is extremely helpful in attacking starbases, who otherwise have extremely strong pressor beams to keep themselves safe. A good ogg on a starbase is a coordinated attack, where SEVERAL people uncloak at one time and fire. It is about overloading the base.
When synchronized, the ogg means that several people get to pop off shots at a starbase while it worries about dodging one set of torps and blowing one person up. The starbase who only has to blow up one enemy at a time is much safer. The ogg is much different in one on one.
It is most effective when an enemy is not aware. Most people pay enough attention to the galactic that it is a little hard to pull off unless the person is engaged otherwise. But that is not to call it effective in general or even in that situation. Only sometimes. The biggest benefit of cloaking is getting around enemies other than your target.
So let's say an enemy tries to ogg you. There is a delay built into the game in between them uncloaking and them firing. That's your window. Punish someone who tries this BS with you.
First, positioning. You can't always fly at an enemy who's ogging you. You can't do well flying at high warp parallel to them. Instead, the most reliable defense is to move 90 degrees or 180 degrees away from them. 90 degrees does the job and doesn't take you out of the action entirely. 180 does the job when you do it as a bob and weave low warp defense - in other words, spongy but not REALLY going anywhere.
Someone flying straight at you is phaser bait. So phaser.
When they unloak, IMMEDIATELY hit pressor, turn and accelerate. Hit slowdown & turn again if they send torps to where you are dodging to. But pressor IS YOUR FRIEND here. It slows them down to a crawl, making them easy fodder for YOUR torps, and gets you out of the way of theirs.
VI. Dodging & A System for Developing Movement
It's not a good idea to leave yourself vulnerable to attack. Dodging is kind of more difficult to discuss, since it involves a lot of quick reactions. But we've covered a lot of the essentials above in understanding the benefits of tractor/pressor and turn-on-a-dime warp speeds.
A Weave & Spin Dogfighting System
In figuring out how to dogfight, I came to the idea of being able to fight & dodge without really giving up ground or making myself particularly vulnerable. I'm sure other fighters have different ideas, but this is intellectually exactly the system I settled on while trying to get better. It works.
The core:
Habit 1 = weave. Your objective is to be able to advance without being easy buttorp meat
- Maintain an orientation approaching the enemy on a right or left diagonal. Weave back & forth while approaching. Flying straight at a guy tends to earn you torps in your face.
- Nonetheless, someone will try to shoot at you while you approach. So let's talk about dodging.
Habit 2 = Spin/rotate. Your objective is to be able to dodge effectively without losing excessive ground.
- If someone fires in front of you (they can't hit you otherwise since you are weaving), you turn. However, you make this turn a near full 360 degree rotation, because you want to still stay near where you are - and to keep on your enemy

- You do this by clicking behind your ship, then clicking again where you want your ship to end up. Since you are flying in a circle, you end up exactly where you started, but timing a brief period of away to when enemy torps are nearly upon you. It's a good, quick dodge.
- You can only get away with this at low warp speeds. At warp 4 or 5 you're less likely to get out of the way in time, and more likely to be predictable in where you end up.
I want to reiterate. This is an approach based on aggression. You are always prepared to bear down on your opponent, and you're always ready to dodge. So what's the concept?
Objective = start using moves like this on a regular basis, and I do believe you will start developing the kind of precision hand/eye coordination that will help you succeed in netrek dogfighting.
So let's return to biometrics and why I think little techniques and ideas like this can work. The concepts involve:
- Practice using technique that you can use at all levels
- Practice with consistency in your choice of techniques
- Practice an awful lot
Since I'm laying out above what amounts to an absolute clickfest though one that doesn't inherently make you lunchmeat, and since this really and truly is how I visualized things when I started getting good, I'm pretty sure that you can get mileage from it.
Netrek clue is about choosing the right tactic for the right occasion. Dogfighting is about being able to get the job done. Good luck!