

The Netrek Take File
This page is provided for all those people who want some examples of Netrek play to discuss. Whether the plays are largely good or bad is irrelevant. The examples are not presented as templates to follow during play, instead they may be considered by players wishing to look in more detail at the way team strategies work (or don't) in the heat of battle. Alternatively this may be a useful resource for getting on a learning curve.
Index on the page
- IMHO - Where I discuss the evolution of the Take in Netrek
- Get the idea? - Where I pontificate, wildly.
- Notes on the Take File - Where matters of importance are imparted.
- Feedback - amoore@novell.com
- The File - Animations and more pontificating..
IMHO
Analysis of Planet Takes is an easy place to start reviewing the tactics employed in Netrek. The goal of the take is simple for both teams and so the success of any Planet Take is easily measured - was the planet taken by the attacking team? lost due to the actions of the defending team? or saved by the defending team? On the face of it there is little difference between a planet being won by the attacking team and a planet being lost by the defending team except who is responsible for the change in the galactic layout.
With a broad view on the game the attacking team loses nothing if they fail to take the planet, but the defending team will lose a whole lot. Planet Takes ARE Netrek. Planet Takes are a tiny little microcosm within the bigger Netrek simulation, and reviewing Planet Takes can probably tell us a lot about playing as a team and winning at Netrek.
The way Planet Takes often unfold is that the a ship that is carrying will target a planet and call the Take to the team. Escort precedes the Taker to the Planet and engages the defending ships. It is the Escort's role to beat back the defenders and to deal with oggers on the lead up to and during the Take. Remember your ship has phasers that can pick out ogging defenders, torpedos that can drive the enemy away from areas of space, and shields that can be raised or lowered to distribute damage or allow refueling and repair. After the planet is Taken (yes, you blinked and missed it) that planet is vulnerable to those ships that were not involved in defending against the Take. Since the planet was lost there must have been some ships on the defending team following some other agenda, otherwise what is the excuse for the defending team losing the planet in the first place??! If the planet was saved then the defenders have been successful, so everyone flies around getting ready to do it again.
Let me rewrite that, inserting some additional possibilities to give you an idea how complex the process really can be:
The way Planet Takes often unfold is that the ship that is carrying will target a planet or selection of planets and call the Take to the team for the planet where the Taker wants the escort to go. This planet may or may not be the intentional target, but for the purposes of the Take the Taker is the grand master of illusion. With assistance from the attacking team members the Taker will create an artifice to present to the defending team and in this way will increase the likelihood of Taking the real target planet. Escort precedes the Taker to the Planet and engages the defending ships, or will push them from the area, or will Ogg the defending Star Base, or will threaten the last remaining horde of armies, or will cloak and threaten a more likely target to draw defending ships, or will tie up the carriers on the defending team who will probably selfishly call for escort, or any number of a billion other strategies depending on the circumstances of the respective teams. It is the Escort's foremost role to beat back the defenders and to deal with oggers on the lead up to and during the Take, thus allowing the Taker to reach orbit and beam down. Everything else is secondary to the goal of taking the planet. Play with the view that taking a planet is like scoring a goal in a ball-sport. The Taker may feint towards the planet and then veer off, causing all hell to break loose in high orbit. The defenders may charge or be split up as some engage the planet or empty their fuel tanks prematurely, ejaculating torpedos into the vacuum in a frantic rush of concern. The Taker may be cloaked or uncloaked for effect. The Taker will be calling the targets as appropriate, probably giving priority to the bigger ships with more powerful weaponry. The Taker will be dodging phasers by warping at moderate speeds to regions of space where the phaser has already been shot. The Taker may detonate some random single torpedos and then move away from the area to create the impression that the defending team should be focusing their attention there. With luck, escort, hasty actions by the defending team, and the grace of the god of net-lag the Taker reaches the planet and stops being maneuverable, and in control of its own future. All events up to this point have been with the aim of reducing the defenders firepower and their commitment to the task of defending the planet. The Taker orbits while bombing existing armies until the planet has no more than 4 remaining on the surface. This is best done in an Assault Ship but Takers cannot be choosers, and Team Captains don't always get their way. The Taker then deposits the armies from its hold onto the planet, which may or may not be in the process of breeding new armies (POP!). The Taker may be raising shields to distribute damage, detting errant torps, or just sitting with their eyes closed counting off the seconds. The Taker may be killed during or after the planet has been neutralized or taken. After the planet is Taken that planet is either safe or vulnerable. The enemy may have been serious in the defense to the point that the attacking armada is now a remnant of its former glory and the planet has only been neutralised. If the planet is neutralised then it is an obvious target and it may be best to leave it neutralised if it takes the focus away from a more strategic take - an Agricultural world or a world with Fuel and Repair facilities on or close to the front line is much easier to retain than a barren lump of rock hanging motionless in space. If the defending team has one ship out of action as it ferries armies to the less-important neutralised planet then so much the better for the attacking team. Remember that the roles of the attacking and defending teams are largely defined by who is currently doing the push and that this changes from second to second. If the Taker is alive and the escort is alive and the planet is won then the Take is a victory since there are ships that can control the space around the planet, or move from their far forward position to foil the plans of the once-defending team who may now be carrying and lining up a counter strike. [eot]
Let me rewrite that, paraphrasing to display the behavior often encountered:
"Woohoo! I just got a kill! I'd better pick up... where's a planet. I'll leave that teammate crippled in space and warp back home to get those two armies. Oh, hold on, we were just taking a planet weren't we? Oh well, I'm sure our guys will be fine. Ok, now home... that's funny, how did all these guys get back here so fast? They can be my escort. I'd better call the Take with CTRL+T while I am all the way back here and then go straight there at max warp. Coolness, now I'm almost a the planet I will cloak. Onto the planet we go. No fair! How did they know where I was! Why aren't my team here? Everything's spinning... phasers... torpedos... why am I uncloaked? Who's pulling me off the planet!?! Argh!!" [boom] "F0 -> FED Where were you all?"
Get the idea?
There are many more ways to lose a planet than there are to take a planet. The Taking team merely has to drop armies on the planet until it changes colour. The defending team must stop this from happening, but they don't necessarily know exactly where or when it will happen. It is the goal of the attacking team to make the odds favour the carrier in the Take. Subterfuge, bullying, lying and outgunning are all acceptable tactics to use during a Take. A defender with a critical eye on the galactic map during a Take can often detect such subterfuge. Always remember that the Taker will at some point in the Planet Take be a "sitting duck" orbiting a planet with shields down. There is no other way to beam down armies! Solitary takes against defended planets do not favour the Taker at all. These Takes leave the Taker exposed and susceptible to premature death.
At the other end of the scale is where the Taker drops armies onto a planet unopposed. The easiest planet takes are the best since they advance your team without undue risk or a negative change in the fortunes of your team. Unexpected Planet Takes by your team are excellent in that they demoralise the enemy and break down the enemy cohesion: "How did I miss that?" or "My team sucks!"
Complications arise when the target planet is hotly contested. Since the Taker is vulnerable, the Taker must work with their team to cause the enemy to waste fuel, fly in irrational directions, chase after decoys, and end up crippled and out of play for a while. Generally the attacking team must try to make the defending team work against themselves. The defending team can deal with this by engaging the enemy Taker early and ignoring the escort. When defending the act of wasting ships to the Escort can be useful if you outgun the attacking team but more often you will be playing into the hands of the enemy who may just pull out and move to a different target far from your home world where you appear with your fresh ship.
Notes on the Take File
The colour maps on the early animations make the Romulan team coloured Yellow, like FED or a sickly shade of green. This is largely OK because the ship types are clearly Romulan.
The animations here are manually captured on a Windows 95 workstation (I've lost most of you already - victims of a holy war). Two types of grabs have been taken. Some are of the local Tactical windows and some include the Galactic, Message, and Player list. The Tactical view animations do not answer such strategic questions as "Why is F6 chasing after K4?". They are presented for comment on how to perform tasks. The full animations are capable of answering such broad scale questions. The message window will signal the intentions of both teams, the statistics/player windows will show the state of each of the ships, and the galactic will show you the state of play at the time the snapshots are taken. Note that the short term fortunes of war rarely tell the full story, so I'm compiling a complete review of a 2 hour INL rules game from April 1997 for publishing here later this year to give a slightly different perspective on planet takes in relation to winning and losing the game.
The animations here are animated GIFs. The current ones have a 1 second delay between frames. These can be pulled apart and recompiled with different options or in a different format by most current graphic utilities and I encourage you to do so.
Some animations do not portray Takes but do illustrate some ship to ship behaviour. Not all animations currently have commentary. Feedback suggestions and text as appropriate.
Feedback
Feedback whatever you want to amoore@novell.com or broadcast your ideas on tactics and strategy to r.g.n. I also point out the Netrek home page at http://www.netrek.org/ for material which is better written and more complete.
If you have some web real estate and want to host this sourcebook then let me know. I'm maxed out and may have to start rotating animations.
Thanks to the daily team within the Digital firewall. We may not be Clue but we are enthusiastic.
The opinions expressed here do not reflect those of my employer. No handcuffs, please, I was just having fun.
Files
File POL833: [Animation]
-
Technical notes:
- The animation colour map make the Romulan planets look as though they are Federation (Yellow). They are not relevant to the example, however.
- This animation shows the complete XShowGalaxy view so comments on strategic points may be made.
-
Chronology:
- There are 2 minutes remaining in the game.
- Initially F5 and O7 both carry. O7 remains out of range of the battle for Pol until the planet is lost.
- F5 threatens and then disengages from the planet as there is no escort and the defence is significant. F2 should be the escort but has an agenda of its own.
- The BB O4 attempts to pinwheel on the planet as well as tractoring the departing F2.
- F2 cripples O4 at Pol and then O4 is destroyed by the Federation escort.
- O3 pinwheels on the planet and is destroyed [3382].
- The Federation escort flanks the Federation taker, rather than engaging the opposition or proactively ogging the Orion carrier.
-
Comments:
-
Strategic:
- O7 initially carries, and could either trust the rest of the team to defend Pol while O7 agresses at Arc or Spi. This would be the proactive approach to the situation. Instead O7 participates in the planet defense. This could be for a number of reasons: with the focus on the one planet, Pol, O7 is guaranteed escort since it is clear where everyone's attention lies; none of the other team members need to juggle the dual responsibility of attacking and defending at two places simultaneously; the skill level of the other players; the time remaining in the game; the number of players on the team.
-
Tactical:
- O7 plinks the planet with Plasma to drive away the Federation ships [3326 & 3384]. The tactic works in that F5 is cautious in the assault and sees a threat causing F5 to pull out [3330], allowing the Orions to establish a presence in the area. Unfortunately for the Orion team, the delay also allows the Federation ships to consolidate their position [3360 onward].
- The Torp Storm over Pol also ensures the taker, DD F5, will move off the planet or die. The torps are fired early enough by O7 and O0 so that the wobble distributes the torps in a cloud. This "torpcage" is displayed more clearly in this unrelated example. The idea behind a torpcage is that "if you Det you die". If you fail to Det you must wear torps.
- F2 escorts F5 by engaging the heavier ship BB O4 [3322 to 3329] and drawing fire from it.
- F2 provides a decoy for F5 as F5 pulls out from Pol.
- F5 decloaks and assists in clearing the planet. Even though F5 is carrying, the odds of the Take being successful are enhanced with more active participation.
- The DD's are flying time bombs. F5 and F2 are both weak ships who explode due to damage received in the line of duty. F2 is detting for F5 and is killed in a chain explosion as the BB O4 barrels onto the scene [3396]. F5 is in orbit and unable to dodge the still-alive O4. The escort needed to be spaced further apart and O4 needed to be destroyed to leave F5 in the area controlling at Pol.
- The ships refueling on the planet are sitting ducks for the enemy ships [3345 & 3379]. Their trajectories are predictable and their fuel state is broadcast to anyone who cares to read the signs. O3 and O4 both do this during the take.
- O7 refuels by dodging at low speeds. O7 will shortly regain the planet since the Federtion ships cannot control it following the Take. Overall the Federation team lose the planet and their carrier because of one Battleship.
-
Strategic:
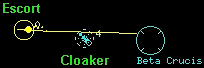
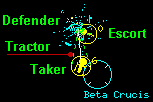
File BET60: [Animation]
In which SC R0 and AS R6 take Beta Crucis with opposition from
SC O4 and DD O3.
Notes:
- The defending and escorting ships are all light weight, Scouts and a Destroyer, compared to the taker, who is in an Assault Ship.
- R0 clears Beta Crucis by destroying the cloaked defender O4. R6 follows making a beeline for Beta Crucis. R0 scans the planet and then intercepts and dies to O4, but O4 has pulled R6 off Beta Crucis by this point. R6 reestablishes orbit and takes the planet as O3 returns. R0 returns as well and finishes O3.
-
O4 is attempting to "trapdoor" either the escort or the
taker. The position is wrong, however. There is a clear tendency for
pilots to fire at cloaked objects by using visible objects as targets.
In this instance the trapdoor ship is directly between the escort and
the planet. Death is swift. When cloaking to Ogg, consider positioning
yourself in an area of comparative vacuum, and consider only engaging
while other of your team mates are around to give the target a false
Red Alert. If you are being fired upon while cloaked, raise your
shields if you anticipate a P-lock or a torp collision.
(3) - R6 does not cloak and so is easily delayed by the defenders as they pluck him off Beta Crucis.
-
R0 scans Beta Crucis rather than engaging the remaining defender, O4.
The result is that the two ships R0 and O4 explode quite close to R6.
R6 has shields raised at this point, however.
(4 & 5) - The defenders fly in fast straight lines. Without the ability to dodge, the ships are at the mercy of phasers and torp clusters.
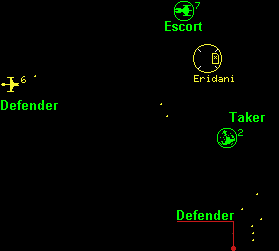
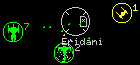
File ERI56: [Animation]
In which DD K2 and BB K7 take Eridani with opposition from SC R1 and DD
R6.
Notes:
- This can be considered an "unopposed" take, as the defending ships are in inappropriate positions with incorrect vectors throughout the approach and drop.
-
The escort, K7, is not in a position to detonate incoming torps. K7
serves throughout the take as a deterrent to R6, who turns tail and
runs from the larger ship quite early.
(1, 2, 3 & 4) - The ship "weights" favour the takers.
- North of Eridani is galactic edge, so no assault can arrive from there. K7 is on the wrong side of the planet, and only serves to draw fire from R1. When firing at a cloaked player, the attacker will often use visible objects as the first targets.
-
K7 is a BB and could have used pressors to drive R1 away from the area
surrounding the planet.
(4 & 5) -
Because the escort is on the far side of the planet, the torps launched
by K7 are a threat to the team mate K2. If R1 had intended to destroy
K2 by dying at the planet while K2 was still in the area, or by
charging K7, the torp stream K7 released could have been detonated by
R1 and K2 would take damage. Avoid firing over the top of cloaked
companions if the threat is in close proximity. In this case, R1 sees
the torp stream as a threat rather than a tool, and so dodges northward
away from the ship with kills.
(6) -
While cloaked, K2 makes 6 course corrections. The net result is that
the periodic exploding torpedos against K2's shields do not serve to
allow R1 to attain a lock.
(7) -
R1 shoots wildly. The phaser shots appear to be attempts to locate K2
rather than to do any damage. One method is to search out a
Phaser-lock, which will remain for a couple of updates, and use the
position information from that shot to get an idea where to send torps.
R1, however aims too high. Assuming K2 touches the planet and attains
orbit at the closest point to K2's last visible position (which
happened), K2 could not have been high on the west side of the planet,
at R1's extreme range of phaser distance. This is a reasonable
assumption to make based on the torpedo detonations on the cloaked
ship. The cloaked ship MAY have been detonating the torpedos, however.
The shot is hopeful, but wild.
(8)
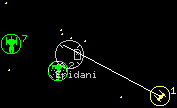
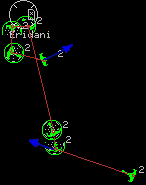
File ERI47: [Animation]
In which SC R0 and DD R6 take a neutral Eridani, but fail to control
following the take and lose it to DD K2 and AS K7.
Notes:
- Consider these to both be unopposed takes. The Klingons are reacting to the threat at Eridani initially, not already guarding the planet. Once R0 is dead from bearing two converging torp streams on it's unshielded hull, the planet is easily recovered by the Klingons. K2 drops and claims Eridani while K7 once again draws fire from a misplaced retreating R6.
File LAL111: [Animation]
In which SC R1 takes Lalande while being chased by AS K5.
Notes:
- K5 loses the plot, floating westward in the vacuum until the point where Lalande is taken. This triggers a resurgence of interest in attacking R1.
- R1 drives K5 off by decloaking and directing a stream of 8 torps at K5. Scout torps cause 25 points damage if they hit, K5 has raised shields (80 points) and a hull strength of 100. K5 will lose shields if it dodges the wrong way or stays on course pursuing R1. The alternative is to detonate the torps and wear the reduced damage, which in the best case is 50 points. In any case, K5 has no hope of catching R1.
- In the ideal case, K5 would have charged the planet instead of drawing off from the chase at around frame 950. The only positive outcome would have been to destroy R1 as it orbited or was accelerating.
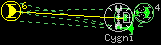
File CYG116: [Animation]
In which Cygni is taken and defended against Klingon assault by a
lightly armed Romulan team.
Notes:
-
The initial neutralisation of Cygni was uncontested. R6 used pressors
against a team member to attain more speed to defend F0 against K4 and
assist in controlling at the planet.
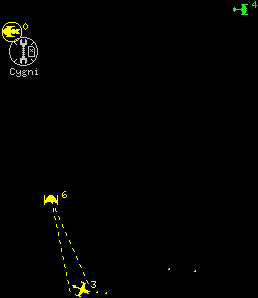
(1) -
K2 "pinwheels" on Cygni for a period. This is where a ship
will sit on a fuel planet, firing torps into the vacuum at distant
ships. It is a bad idea as it makes your ship's movements predictable -
if you don't move you will continue to orbit, if you do move you will
start from rest. The best way to break orbit when under threat is to
pressor or tractor yourself off and up to speed, or to cloak and then
depart in an unexpected direction.

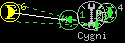
(2) -
The fallout from the battle gives K4 a kill, who then carries to Cygni.
The "Escort" enthusiastically engages the enemy at this
point, crowding the taker, K4, and causing an unfortunate chain
explosion which ultimately engulfs the taker before the planet is
claimed.
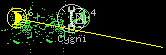


(3 & 4) - The suicide run by R6 is at maxwarp at the center of the planet. Once again, even though the cloaker is invisible, it is undone by the proximity to other visible objects as well as the commitment to an existing course. K4 cloaks quite late and maintains a constant course. K2 appears to have shields lowered. The ogger, R6 is also tractored by the escort K2 who may be attempting to leave the area by getting up to speed or may be attempting to draw R6 into their weapons range. Either way the result is disastrous for Klingon.
File XXXXXXV:
[Animation] Ogging
Technique
In which SC K8 oggs AS R7 under the nose of SB R2, DDR4 and CA RA.
Technical: The Rom colours are screwed due to the capture
process. Yellows should actually be Red.
File XXXXXXW:
[Animation] Ogging
Technique.
In which CA R7 uses a false positive Red Alert generated by the
companion ship AS R8 to ogg DD K2.
File REG81: [Animation]
In which DD K1 escorts DD K5, dying to CA R6 allowing Regulus to be
taken by K5.
Notes:
- The escort, K1, is positioned between K5 and the defender, R6. This allows K1 to detonate the torps from R6. All of R6's weaponry is ineffective with K1 blocking the view.
-
K5 doesn't cloak while on the planet, this allows R6 to break K5's
orbit.

(1 & 2)
\n"; echo getFooter(); ?>